Showing posts with label root. Show all posts

How to Root Galaxy S4 I9500 on Android 4 2 2 XWUBMG5 Jelly Bean Firmware

| 0 comments |

The Exynos 5 octa-core variant of Samsung Galaxy S4 (GT-I9500) has received a new software update with firmware build number I9500XWUBMG5. The new software update is still based on Android 4.2.2 Jelly Bean version and now available in India, Nepal, Sri Lanka, and Bangladesh.

Samsung Galaxy S4 I9500 users who have already updated their devices with Android 4.2.2 XWUBMG5 Jelly Bean, may root their devices using the tutorial below.

This tutorial uses CF-Auto-Root file released by recognised XDA Developers, Chainfire. The CF-Auto-Root file allowing Galaxy S4 users to root their devices easily without depending on the firmware. It completely supports Android 4.2.2 Jelly Bean and future firmware as well. Head over to the CF-Auto-Root main thread to learn more about the root method.

Disclaimer: Rooting voids the warranty of your device. We and the developer of this rooting procedures shall not be held responsible if any undesirable outcomes may happen to your device. use of this root guide is solely at your own risk!

Pre-requisites
1. Install USB Drivers for Samsung Galaxy S4 on the computer.
2. Enable USB Debugging Mode on the phone by navigating to Settings >> Developer Options.
3. Make a backup of all your important data before following the guide.
4. The Galaxy S4 should be factory unlocked and not locked to any particular carrier.
5. Ensure the battery of the phone is charged more than 80 per cent.
6. The CF-Auto-Root file works only on Samsung Galaxy S4 I9500. Applying this to any incorrect variant might brick the device. Verify the model number of the Galaxy S4 by navigating to Settings >> About Phone.

File Required
1. CF-Auto-Root for Galaxy S4 I9500 (CF-Auto-Root-ja3g-ja3gxx-gti9500.zip)
2. Odin 3.07

Steps to Root Galaxy S4 I9500 Running on Android 4.2.2 XWUBMG5 Jelly Bean Firmware
Step 1: Extract CF-Auto-Root and Odin 3.07 files using winrar/7zip/winzip or any other extracting tool.
Step 2: Switch off the Galaxy S4. Then boot the device into Download Mode by pressing and holding Volume DownHome and Power buttons together until a construction Android robot icon with a warning triangle appears on screen. Now press the Volume Up button to enter Download Mode.
Step 3: Launch Odin on the computer as an Administrator.
Step 4: Connect the Galaxy S4 to the computer using USB cable while it is in the Download Mode. Wait until Odin detects the device. When the device is connected successfully, the ID: COM box will turn blue with the COM port number. Additionally, the successful connected will be indicated by a message saying Added.
Note: If the Added message does not appear, then try re-install USB drivers or changing the port on the computer.
Step 5: In Odin, click the PDA button and select the CF-Auto-Root-ja3g-ja3gxx-gti9500.tar.md5 file.
Step 6: Verify that Auto Reboot and F.Reset Time checkboxes are selected in Odin. Also, ensure the Re-Partition option is not selected.
Step 7: Double-check and click Start in Odin. The installation process will now begin.
Step 8: Once the installation process is completed, your phone will restart and soon you will see a PASS message with green background in the left-most box at the very top of the Odin. You can now unplug the USB cable to disconnect your device from computer.

Samsung Galaxy S4 I9500 running on Android 4.2.2 XWUBMG5 Jelly Bean firmware is now rooted successfully. You can now install any app that requires root permission. Verify the root status of the device by downloading Root Checker app from Google Play Store.

Thanks to all fellas at XDA who first tried out this rooting technique. This method was originally posted via XDA-Developers original thread.


Android Apk
Read More..

GMD GestureControl ★ root apk Download

| 0 comments |
GMD GestureControl ★ root apk

Current Version : 6.3.1
Requires Android : 3.1 and up
Category : Tools
Size : 1.8M

Original Post From http://apkandroiddownloads.blogspot.com


GMD GestureControl ★ root apk Description

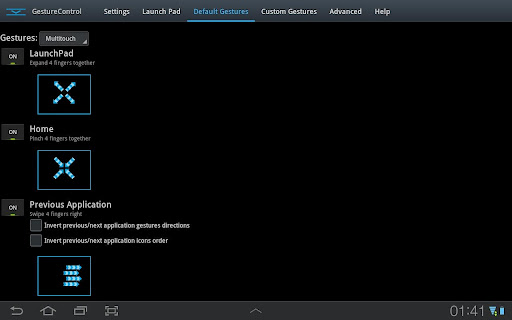
Control device with MULTITOUCH and MULTITASK gestures similar to iPad. Works in all applications. You can even hide status bar and enjoy full screen in your favorite games or while browsing.

"For those who tend to get tired of Android's status bar, or just want more intuitive gesture-based controls on their tablet, this app is definitely worth a shot." - Android Police

★ Try Lite version before you buy
★ Requires root access

★ Multitouch
★ Multitask - start any application, shortcut or custom action without leaving current application
★ Custom actions - LaunchPad, Start application, Previous Application, Next application, Home, Kill current application, Back, Forward, Recent application list, Recent application dialog, Menu, Notification Panel, Hide/Show status bar, Start launcher shorcut(bookmark, contacts, settings, etc), Start Tasker task, Pause gestures, Exit, Screen Off (lock), Alt+Tab, Music Play/Next/Previous, Volume, Search, Voice Search, Select Input Method.
★ Swipe 4 fingers right - open previous application
★ Swipe 4 fingers left - open next application
★ Expand 4 fingers - LaunchPad (similar to SwypePad, start any application, shortcut or custom action)
★ Pinch 4 fingers - Home gesture
★ Swipe 3 fingers down - Back gesture
★ Swipe 3 fingers up - Bottom recent applications bar
★ Swipe 4 fingers up - Hide/Show status bar (experimental)
★ Custom gestures - create your own gestures to start any application, shortcut or custom action

THERE IS NO WAY TO ANSWER MARKET COMMENTS OR CONTACT COMMENTATOR - EMAIL ME IF YOU WANT ANSWER.
Please don't post your problems in market, email me or go post to XDA, thanks:
http://forum.xda-developers.com/showthread.php?t=1535740

If your device is listed as unsupported, please read FAQ in Help tab. If it still do not work, contact me by email: goodMoodDroid@gmail.com

Description: This application allows you to control tablet with gestures.
Swipe 4 fingers up to hide status bar. Do same gesture again to restore bar.
Swipe 4 fingers right to open previous application.
Swipe 4 fingers left to open next application.
Pinch with 4 fingers anywhere on screen to return to home screen from any application.
Swipe 3 fingers down to execute back action in any application.
Swipe 3 fingers up to show custom bottom bar with recent applications.
Expand 4 fingers anywhere on screen to open LaunchPad dialog. It is similar to SwypePad and allows start your most often used applications, shortcuts or custom actions anywhere anytime with simple gesture.
Works in all applications, games and browsers.
Application will use freed space when you hide status bar. Some games even work better with status bar hidden.
There is an option to switch to single touch gestures if its more convenient. You can even create your own gestures for any action.

Full version adds following features: option to hide notification icon, custom gestures and special actions, any number of actions in LaunchPad.

Tags: Hide bar, gesture, gestures, gesture control, gesturecontrol, status bar, system bar, full screen, Honeybar, ICS, SwypePad, iPad, GMD, G.M.D.


GMD GestureControl ★ root apk Videos and Images


Visit us on http://apkandroiddownloads.blogspot.com

download


Android Apk
Read More..

How to Root Galaxy S3 I9300 on Android 4 3 Jelly Bean Firmware

| 0 comments |

The International version of Samsung Galaxy S3 with model number GT-I9300 has received Android 4.3 Jelly Bean update firmware. The new official firmware is currently available as an Over-The-Air (OTA) update as well as through Samsung KIES.

Samsung Galaxy S3 I9300 users who have already updated their devices with Android 4.3 Jelly Bean, may root their devices using the tutorial below.

This tutorial uses CF-Auto-Root file released by Elite Recognized XDA Developers, Chainfire. The CF-Auto-Root file allowing Galaxy S3 users to root their devices easily without depending on the firmware. It completely supports Android 4.3 Jelly Bean and future firmware as well. Head over to the CF-Auto-Root main thread to learn more about the root method.

Disclaimer: Rooting voids the warranty of your device. We and the developer of this rooting procedures shall not be held responsible if any undesirable outcomes may happen to your device. use of this root guide is solely at your own risk!

Pre-requisites
1. Install USB Drivers for Samsung Galaxy S3 on the computer.
2. Enable USB Debugging Mode on the phone by navigating to Settings >> Developer Options.
3. Make a backup of all your important data before following the guide.
4. The Galaxy S3 should be factory unlocked and not locked to any particular carrier.
5. Ensure the battery of the phone is charged more than 80 percent.
6. The CF-Auto-Root file works only on the international version of Samsung Galaxy S3 (GT-I9300). Applying this to any incorrect variant might brick the device. Verify the model number of the Galaxy S3 by navigating to Settings >> About Phone.

File Required
1. CF-Auto-Root for Galaxy S3 I9300 (CF-Auto-Root-m0-m0xx-gti9300.zip)
2. Odin 3.07

Steps to Root Galaxy S3 I9300 Running on Android 4.3 Jelly Bean Firmware
Step 1: Extract CF-Auto-Root and Odin 3.07 files using winrar/7zip/winzip or any other extracting tool.
Step 2: Switch off the Galaxy S3. Then boot the device into Download Mode by pressing and holding Volume Down, Home and Power buttons together until a construction Android robot icon with a warning triangle appears on screen. Now press the Volume Up button to enter Download Mode.
Step 3: Launch Odin on the computer as an Administrator.
Step 4: Connect the Galaxy S3 to the computer using USB cable while it is in the Download Mode. Wait until Odin detects the device. When the device is connected successfully, the ID: COM box will turn to light blue with the COM port number. Additionally, the successful connected will be indicated by a message saying Added.

Note: If the Added message does not appear, then try re-install USB drivers or changing the port on the computer.

Step 5: In Odin, click the PDA button and select the CF-Auto-Root-m0-m0xx-gti9300.tar.md5 file.
Step 6: Verify that Auto Reboot and F. Reset Time checkboxes are selected in Odin. Also, ensure the Re-Partition option is NOT selected.
Step 7: Double-check and click Start in Odin. The installation process will now begin.
Step 8: Once the installation process is completed, your phone will restart and soon you will see a PASS message with green background in the left-most box at the very top of the Odin. You can now unplug the USB cable to disconnect your device from computer.

Samsung Galaxy S3 I9300 running on Android 4.3 Jelly Bean firmware is now rooted successfully. You can now install any app that requires root permission. Verify the root status of the device by downloading Root Checker app from Google Play Store.

Thanks to all fellas at XDA who first tried out this rooting technique. This method was originally posted via XDA-Developers original thread.


Android Apk
Read More..

Font Installer Root v1 0 Download APK

| 0 comments |
Font Installer *Root* v1.0


Description
This app allows you to choose between hundreds of fonts to apply to your whole device. You must be rooted with busybox installed. If you do not know what "root" is please dont download this app or rate poorly.

Features include:
- Hundreds of fonts to install with previews
- Download/load fonts in background
- Preview fonts page w/ swipe gestures to switch between previews
- Install any font from your SD card
- Backup/Restore system fonts
- Choose which system fonts to override
- Set the install & download path
- Hot reboot (fast reboot)

Donate Users (get license for 99 cents):
- Select font favorites
- Remove ads


https://sites.google.com/site/freeapkandroidapps3/Market_3.4.4.apk


Android Apk
Read More..

root Triangle Away apk Fast Download

| 0 comments |
[root] Triangle Away apk
[root] Triangle Away apk

Current Version : 2.90
Requires Android : 2.3.3 and up
Category : Tools
Size : 267k

Original Post From http://apktoolsdownload.blogspot.com


[root] Triangle Away apk Description

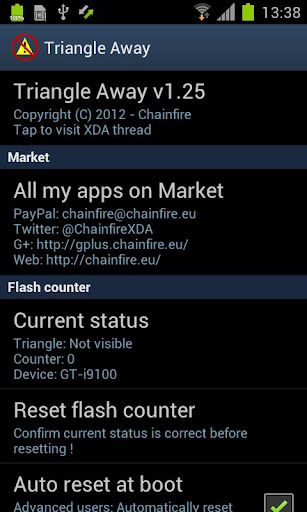
Many Samsung devices store a flash counter that keeps track of how many times you have flashed *custom* firmwares to your device. On some devices, a yellow triangle or other sort of visual warning is also displayed during boot if you are running a *custom* firmware. TriangleAway was built to disable the triangle (if a visual warning is present) and reset the custom ROM flash counter to 0. This app requires root !

You can find out the current status of your flash counter and firmware state (custom or official) by booting into "download mode" on most devices. The usual way of getting into "download mode" is by first turning off your device, then turning it on by pressing and holding VolDown+(Home)+Power. Alternatively, the "adb reboot download" command also often works.

When you run TriangleAway, if your device and firmware are supported, it will show you the detected state of the binary (custom or official) and flash counter value, and the option to "Reset flash counter". Please confirm that the information shown is correct before resetting the values.

On a number of devices, TriangleAway can work, but your firmware may not be supported directly. In that case, the app will tell you it needs to reboot into a special boot mode, which will be happen if you select "Reset flash counter". The device will reboot into a special mode which will allow you to review the current status and reset the binary and flash counter values (or abort and do nothing). On some devices this will actually trigger the counter to 1 if its 0 - so if you're "just checking", do that in download mode!

!!! THIS IS A DANGEROUS OPERATION AND COULD POTENTIALLY BRICK YOUR DEVICE. PROCEED AT YOUR OWN RISK. A USB JIG IS PREFERRED IF YOU HAVE A WORKING ONE !!!
( and by brick I mean brick - only a board replacement or a JTAG unit will be able to save you, don't mess with boot(loader) stuff unless you *really* mean it! )

Note#1: using Triangle Away may unmount your SD card. Reboot or manually remount it from Android settings.

Note#2: on new devices like the SGS3/SGNote2/SGNote10.1, status can only be reset on some firmwares - they must be stock firmwares!

Supported devices:

Samsung Galaxy S2:
- GT-I9100 **
- Sprint Epic 4G Touch **
- Korea SHW-M250K/L/S **

Samsung Galaxy Note:
- GT-N7000 **
- GT-I9220 **

Samsung Galaxy S3:
- GT-I9300/I9300T **
- USA: AT&T, Sprint, T-Mo, VZW (unlock bootloader !), USCC, MetroPCS, Cricket, CSpire
- Canada
- GT-I9305/I9305T/I9305N LTE **
- Korea SHV-E210K/L/S **
- Korea SHW-M440S **

Samsung Galaxy Note 2:
- GT-N7100/N7100T/N7102/N7105/N7105T **
- SPH-L900 Sprint **
- SGH-T889 T-Mobile **
- SGH-T889V Canada **
- SGH-R950 US Cellular **
- SGH-I317/M AT&T/Canada **
- SCH-I605 Verizon ** (unlock bootloader !)
- Korea SHV-E250K/L/S **

Samsung Galaxy Camera EK-GC100 **

Samsung Galaxy Note 10.1":
- GT-N8000 3G **
- GT-N801x Wi-Fi **
- GT-N8020 LTE **
- SHW-M480S/K/W **

Samsung Galaxy Tab 2:
- GT-P310x 7" 3G
- GT-P311x 7" Wi-Fi
- GT-P510x 10.1" 3G
- GT-P511x 10.1" Wi-Fi

Various:
- I8160, I8190
- I9070/P
- I9082
- I9260
- S7500, S7560, S7562

** Various models are supported depending on firmware, but only the exact models listed are supported regardless of firmware version.

Whether or not Triangle Away works may depend on your kernel, try flashing a different one if it doesn't work.

Please also note that some devices set the counter to 1 at every boot if you are running a custom kernel or recovery. On these devices, Triangle Away may always display 1 - make sure to check the counter in actual download mode.

For discussion and technical details, see the XDA-Developers.com thread here:

http://forum.xda-developers.com/showthread.php?t=1494114

Note that this download is also available from that thread completely for free. You can go there and download it for free, or buy me a beer and download it from Play. It is the same program.

I'm not sure about future updates - http://www.chainfire.eu/articles/118/Triangle_Away_vs_Samsung/


[root] Triangle Away apk Videos and Images


Visit us on http://apktoolsdownload.blogspot.com

download


Android Apk
Read More..

How To Root And Install Custom Recovery On Samsung Galaxy Ace Plus S7500

| 0 comments |

Samsung-Galaxy-Ace-Plus

How To Root & Install Custom Recovery On Samsung Galaxy Ace Plus S7500

Before You Begin:

  1. This method is tested in Samsung Galaxy Ace Plus S7500 Only.
  2. Windows Based PC or Laptop is required.
  3. Download & Install Samsung Galaxy Ace Plus USB Drivers.
  4. Enable USB Debugging Click Here if you dont know how to
  5. Make sure your is charged 70% at least.
  6. Make a backup of all your data for safety.

Download Required Files:

  1. Odin v3.07 (Download Odin v3.07 only)
  2. Custom CWM Recovery (clockworkmod-5.0.2.8.tar.md5)
  3. Root Package

Install Custom Recovery In Samsung Galaxy Ace Plus:

  1. Make sure you done all the steps given above.
  2. Download & Extract Odinv3.07 zip file.
  3. Turn off your device completely.
  4. Boot your device in Download Mode, Press & Hold Volume Down + Home Button + Power Button ,If it shows a warning press Volume Up.
  5. Start Odin v3.07.exe file from extracted Odin zip file as a Administrator.
  6. Connect your device to PC with USB cable.
  7. Make sure your USB drivers is installed correctly and let him detect your device.
  8. Added message appear in the left lower message box and the comport turn yellow when your device is detected by odin.
  9. Now click on PDA button and select clockworkmod-5.0.2.8.tar.md5 you download above.
  10. Make sure that Auto Reboot is ticked & Repartition is unticked in ODin.
  11. Click on Start button and the process will begin.
  12. The phone will restart in recovery mode and update process will carried out.
  13. When the process complete the ID Com turn Green and a PASS message will appear in the lower left message box.

Root Samsung Galaxy Ace Plus:

  1. Download & Extract the Root Package in a empty folder (Download Link Given Above).
  2. You will find a runme.bat file in the extracted folder.
  3. Now turn off your device and boot into recovery mode, Press & Hold Volume Up +Volume Down + Home Button + Power Button together.
  4. As it enter into recovery mode immediately press Menu Button.
  5. Connect your device to PC with USB cable.
  6. Now Run the RunMe.bat file you find in the extracted folder.
  7. Wait for the completion of rooting process.
  8. After completion of rooting process select reboot system now in recovery mode.
  9. After your device reboot you will find a SuperUser app in App Drawer of your device.
Your Device is rooted now enjoy...
Read More..

How To Root Samsung Galaxy Note 3 Easy Method

| 0 comments |
942013115559PM_635_samsung-galaxy-note-3

How To Root Samsung Galaxy Note 3

Install CWM Custom Recovery In Samsung Galaxy Note 3 From Here

Before You Begin:

  • You need a Windows based PC or Laptop.
  • This method is tested and working on Samsung Galaxy Note 3 (N900, N9005, N900T, N9002 Only)
  • Download Samsung USB Drivers Here and connect your device with PC for complete the installation.
  • Enable USB Debugging in your Samsung Galaxy Note 3.Click Here if you don’t know how to enable.
  • Your device must be charged 50% minimum.
  • Make backup of device data for safety.
Please note that this method is tested on the models given above. As soon it is tested on other we will update this article.

Download Required Files:

  • AutoRoot (Samsung Galaxy Note 3 N900 International Exynos)
  • AutoRoot (Samsung Galaxy Note 3 N9005 International Snapdragon 800)
  • AutoRoot (Samsung Galaxy Note 3 N900T T-Mobile)
  • AutoRoot (Samsung Galaxy Note 3 N900P Sprint)
  • AutoRoot (Samsung Galaxy Note 3 N900W8 Canadia)
  • AutoRoot (Samsung Galaxy Note 3 N9002 China)
  • AutoRoot (Samsung Galaxy Note 3 N900S  Korea)
  • Download Odin V3.09 For Samsung Galaxy Note 3 (In the last of article)
Please check your device model first Settings>About Device>Model Number. Then download the AutoRoot for your Model.

How To Root Samsung Galaxy Note 3:

  • Download both Odin & Root Package in your PC.
  • Extract both Odin & Root Package in your PC (Extract the .tar.md5 file from Root Package).
  • Now Turn off your device completely.
  • Boot your device in Download mode , Press & Hold Volume Down + Home Button + Power Button.You will see a Android logo now press the listed button to enter in Download Mode.
  • Now launch the Odin .exe file and connect your device to PC with USB cable.
  • Wait for Odin to detect your device.ID:COM box in Odin turn Yellow after detecting.(Make sure the drivers is installed).
  • Now click on PDA button in Odin and locate & select .tar.md5 file from the extracted Root Package folder.
  • Only check Auto Reboot & F.Reset  option, don’t tick any other option.
  • Now click on Start button in Odin to start the installation process.It take few minutes to finish.
  • You will see a PASS message in Odin message box after successful installation.
  • Your device reboot automatically.
  1. Congrats!!! your device is successfully rooted now :D . If you want to install CWM Custom Recovery In Galaxy Note 3 Click Here.If you face any problem please leave an comment below or connect us on our Facebook Page :) .
Read More..

Tutorial Cara Root Advan Vandroid T 100 Working

| 0 comments |
Tutorial Cara Root Advan Vandroid T 100% Working - Tadi pagi ada seorang client yang meminta rooting Advan Vandroid T. Ia bilang katanya ingin menambah tweak RAM untuk meningkatkan kinerja Android karna Vandroid T nya lelet. Selain itu juga ingin menambah & melegakan memori internal dengan Link2SD.

Saya maklumi hal tersebut karna tablet yang satu ini memang memiliki spec yang tidak begitu gahar dibanding tablet lain sekelasnya. Tapi sebetulnya device ini juga sudah lumayan untuk sebuah tablet yang sudah memiliki SIM Card dan juga Digital TV.

Advan Vandroid T ialah tablet Android 7 inch besutan Advan, dilaunching setelah Advan Vandroid S5 keluar. Spesifikasinya memakai layar 7 inch WVGA (480 x 800 pixel), processor Cortex A9 1GHz beserta RAM 512MB dan internal yang juga 512MB (namun kenyataannya hanya 140MB yang saya dapat pada saat saya cek di menu App). Daya tahan baterainya 3000mAh.

Beberapa fitur unggulan lain yang mungkin tidak akan anda temui di tablet Android lain yaitu seperti Multi Finger Touch, Multi Media, Anti Lag 3D Games dan V Color Engine, Multi Entertainment, TV Digital dan HD Video, Multi Protection, Face Unlock dan lain-lain.

Tutorial Cara Root Advan Vandroid T 100% Working

Tutorial Cara Root Advan Vandroid T 100% Working, caranya kita cukup memakai TPSparkyRoot. Saya belum mencoba rooting Advan Vandroid T menggunakan SuperOneClick yang denger-denger work untuk Vandroid T ini, sedangkan memakai UnlockRoot sudah saya test dan hasilnya fail.

Step by step nya sebagai berikut :
  • Download driver Vandroid T di link berikut : http://www.cellphonemic.com/download/MTK6573-Driver.rar
  • Download TPSparkyRoot di link berikut : http://www.4shared.com/zip/96UxlMxX/TPSparkyRoot.html
  • Setelah kedua file diatas berhasil di download, ekstrak keduanya di komputer anda lalu instal driver Vandroid T nya
  • Sambung Vandroid T kedalam komputer menggunakan USB kabel data, pastikan Vandroid T anda terdeteksi dengan tanda muncul installing driver di layar komputer anda
  • Buka hasil ekstrakan TPSparkyRoot, jalankan TPSparkyRoot.bat
  • Ikuti perintah yang muncul
Mungkin ini bisa jadi akan membuat anda bingung. TPSparkyRoot akan melakukan rooting terhadap Vandroid T anda secara bertahap. TPSparkyRoot.bat akan melakukan prosesnya bertahap 3x dengan ketentuan akan melakukan booting Vandroid T sebanyak 3x.

Jadi saat TPSparkyRoot.bat terbuka, sambung Vandroid T anda kedalam komputer. Pastikan Vandroid T nya terbaca di TPSparkyRoot.bat nya. Bukan DEVICE NOT FOUND dan sebagainya. Setelah itu klik sembarang untuk melanjutkan. Nanti Vandroid T anda akan melakukan booting untuk pertama kalinya. Tunggu hingga Vandroid T nya menyala. Jika sudah, pada TPSparkyRoot.bat klik lagi sembarang tombol untuk meneruskan prosesnya menuju booting yang ke 2. Lanjutkan sampai dengan yang ke 3 dan bila muncul kode 0 pada TPSparkyRoot.bat nya maka bisa dipastikan rooting Vandroid T anda sukses.

Semoga berhasil :)

Baca bagian daftar isi untuk tutorial menarik lainnya atau masuk ke page Curhat Android untuk bertanya / berdiskusi soal android.
Read More..

Xperia Z root now working on handsets with locked bootloaders

| 0 comments |

An exploit has been discovered on the Sony Xperia Z that allows users to root the phone even if their bootloader is locked. Most phones bought directly from some carriers such as O2 and Three in the UK will have locked phones, which means they won’t get to dabble with custom ROMs. However, this exploit means that they can at least enjoy a rooted phone.
The exploit was discovered by @goroh_kun who provided a rootkit. Another user, @huhka_com then packaged an EasyRooting Toolkit for people to use. The exploit is designed for use on the Japanese DoCoMo version of the Xperia Z (SO-02E), but western users of the Xperia Z (C6603) are reporting success too. More details (in Japanese) can be found here.
Read More..

GMD GestureControl root 4 2 1

| 0 comments |
GMD GestureControl ? root v4.2.1 Apk - Control tablet with MULTITOUCH gestures like iPad. Hide status bar, full screen.

Control device with MULTITOUCH and MULTITASK gestures similar to iPad. Works in all applications. You can even hide status bar and enjoy full screen in your favorite games or while browsing.

? Try Lite version before you buy
? Requires root access
? USB Debuging must be enabled in Android setting

? Multitouch
? Multitask - start any application, shortcut or custom action without leaving current application
? Custom actions - LaunchPad, Start application, Previous Application, Next application, Home, Kill current application, Back, Forward, Recent application list, Recent application dialog, Menu, Notification Panel, Hide/Show status bar, Start launcher shorcut(bookmark, contacts, settings, etc), Start Tasker task, Pause gestures, Exit, Screen Off (lock), Alt+Tab, Music Play/Next/Previous, Volume, Search, Voice Search, Select Input Method.
? Swipe 4 fingers right - open previous application
? Swipe 4 fingers left - open next application
? Expand 4 fingers - LaunchPad (similar to SwypePad, start any application, shortcut or custom action)
? Pinch 4 fingers - Home gesture
? Swipe 3 fingers down - Back gesture
? Swipe 3 fingers up - Bottom recent applications bar
? Swipe 4 fingers up - Hide/Show status bar (experimental)
? Custom gestures - create your own gestures to start any application, shortcut or custom action

THERE IS NO WAY TO ANSWER MARKET COMMENTS OR CONTACT COMMENTATOR - EMAIL ME IF YOU WANT ANSWER.
Please dont post your problems in market, email me or go post to XDA, thanks:
http://forum.xda-developers.com/showthread.php?t=1535740

GMD GestureControl ? root 4.2.1
$5.31

If your device is listed as unsupported, please try default parsers:
1) Start application
2) Open Advanced tab
3) Is multitouch device detected properly? If not, enable Override multitouch device detection and select your multitouch device. 
4) Enable Override touch events parser detection. Select HC_DEFAULT. Click Restart service, wait a few seconds, try if it is working.
5) If it is not working with HC_DEFAULT, try ICS_DEFAULT. Dont forget to restart service again. 
6) If you make it work, please go to Help tab, click List devices and send me screenshot. Tell me that it is working with these settings. I will update application so it is detected properly in next version.
7) If it still do not work, contact me by email: goodMoodDroid@gmail.com

Known issues:
- On ICS hiding bar will reset your wallpaper to default.
Live wallpapers dont have issues. You can use "simple image wallpaper" from market to solve this problem. 
- On ICS hidden bar might reapear on some ROMs
- There is no issues on Honeycomb.

Description: This application allows you to control tablet with gestures. 
Swipe 4 fingers up to hide status bar. Do same gesture again to restore bar. 
Swipe 4 fingers right to open previous application. 
Swipe 4 fingers left to open next application. 
Pinch with 4 fingers anywhere on screen to return to home screen from any application. 
Swipe 3 fingers down to execute back action in any application.
Swipe 3 fingers up to show custom bottom bar with recent applications.
Expand 4 fingers anywhere on screen to open LaunchPad dialog. It is similar to SwypePad and allows start your most often used applications, shortcuts or custom actions anywhere anytime with simple gesture.
Works in all applications, games and browsers. 
Application will use freed space when you hide status bar. Some games even work better with status bar hidden.
There is an option to switch to single touch gestures if its more convenient. You can even create your own gestures for any action.

Full version adds following features: option to hide notification icon, custom gestures and special actions, any number of actions in LaunchPad.

GMD GestureControl ? root 4.2.1

REQUIRES ANDROID:3.1 and up

Download Apk ;
GMD GestureControl ? root 4.2.1 - Mediafire

Market :
https://play.google.com/store/apps/details?id=com.goodmooddroid.gesturecontrol
Read More..